The purpose of this tutorial is to create an animated GIF image in GIMP.
Getting started
Step 1:
Open GIMP and Create a new image.
To create a new image go to file-new and set the width and height by 300px and 60px respectively. Once you are done hit "OK".Step 2:
Type Some text.
In this step, you need to type some text on the canvas. To do so, you first need to select the “text tool” from the toolbox- tool options.Once the text tool is active select the area inside the canvas from where you need to start typing. For my text, I am using the text “GIMP is awesome...”. So I will first write the word “GIMP”.
Once you type the word GIMP your canvas and layer palette will look like the screenshot below:
Note: For my text animation GIF image, I am using text color as black, font-family as Trebuchet MS Bold and font-size of 24px. You can set all these fields the way you want for your animated GIF image.
Step 3:
Repeat the step 2.
Once you are finished with the first word of your animation, It's the time to write the second word of your animation. For my image, the second word will be “IS”.#Tip: For this, you need to repeat step 2.
Here when you type the second word of your animation you will have three layers in your layer palette(Background, GIMP, and IS) as specified in the figure below:
And your canvas will look like this.
Step 4:
The final text of the Animation:
For the last word of your animation("Awesome" in my case), you will need to follow the same strategy as you have applied in the 2nd and 3rd step above.Note: For the last and final word of my animation text, I will be using the Font-Color set to RED while the font-family and font-size will be the same.
Your canvas and layer palette will look like the picture below:
Step 6:
Check your Animation.
To check how your animation will look, From the main menu, you need to select filters→ Animation→ Playback.In the above step, you will find that the animation is too fast and you need to make it a bit slow to make it more look attractive.
Now to set the duration of your animation, you will need to make some changes in each and every layer in the layer palette as specified in the screenshot below.
As you can see in the screenshot above, In each layer(frame), I have added animation duration in brackets like (200ms), (600ms), (60ms) and so on... The purpose of this is to create some delay in the frames of the animation.
Note: 1 second is equal to 1000 milliseconds.
To set the animation span, right-click on any layer and select rename to add the delay in milliseconds(ms).
#Tip: Put the value in round brackets() to make it work properly.
Step 7
End Step.
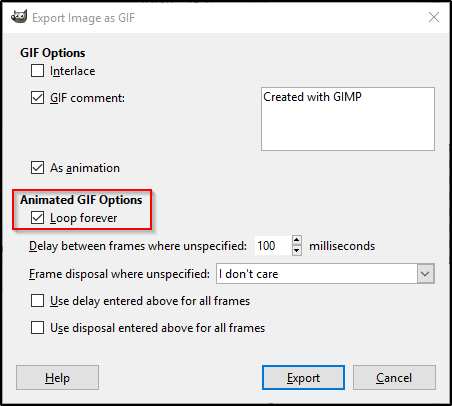
Export your image in the GIF format.To export: go to file- Export As – From Select File type(By Extension)- Select GIF and Click Export. In the export dialog box select loop forever option as specified in the screenshot below:


Ahh, I've been needing something like this for awhile now! :D I'm going to give it a try!
ReplyDeleteThank you..
Delete