Purpose
The Purpose of this tutorial is to design a simple floating logo that appears to look like a 3D object.

For me, this is a fun process, and I feel by following these simple actions, and concepts you will be ready to design your own floating logo.
However, having a step by step guide doesn't mean you'll design everything fabulous on your first attempt. Start following the method and at some point, you will see your rugged design turns into a classic design.
Open GIMP if you have already installed it, if not you can download it from the GIMP official website.
For Convenience, you can use GIMP user interface as a single-window mode by selecting through Windows → Single-Window Mode. It is the one time process and by activating this mode, it will be easier for you to navigate throughout the GIMP interface.
Step 2:
To create a new drawing select file from the menu bar and click new or press CTRL+N from your keyboard.

This will open the “Create a New Image” dialog box as specified in the above illustration, with choices for you to specify the picture width and height.
Set the dimensions of this new image to any size you want and hit OK, but for this tutorial, I am going to specify the Width and Height of 250px.
It will open a pure white new image on your canvas.
Step 3:
1) To fill the picture with black color, Set the Foreground Color to black as specified in the screenshot below.

2) Select Bucket Fill Tool from Tool options Toolbox defined in the fig. below or Tools → Paint Tools → Bucket Fill.

Once the tool is activated, click on the image area(Canvas) and your image should now fill with black color.
Step 4:
Repeat Step 3 to set the foreground color to white. Also, you can quickly swap foreground/background colors using the arrows like the screenshot below or by pressing "X" from your keyboard.

Now add text to your image. To add text select text tool from the Toolbox - tool options like the screenshot below or by pressing "T" from your keyboard.

After Selection of Text Tool, we need to draw a box on our canvas (image) to hold the text. Click on the top-left corner and drag the mouse down to the bottom right corner. You will see something like the screenshot below.

You don't have to worry about being exact at this point because you can set the boundaries of the box later. To re-size the box, click and drag in any of the marked red areas, as shown in the screenshot below.

Add some text inside the box for which you require to design the logo. In my example, I’ll use the word "One".
When you add the text to your canvas, it will appear very small in size. To increase the size select the whole word and increase the size of the font, you can also change the font-family. In my case, I will use 102px as font-size and Georgia Bold as a font family as specified in the screenshot below.

Note: There are some other ways to change the font size and font family for the text, but the way I suggested is the easiest one.
Step 5:

At this time your Layer palette will have three layers on it as background, the text(One) and new layer visible and look something like this:

As you see above, there is a white border around the “Visible” layer. It means that this layer is currently active and any actions you perform will get implemented on this layer and now we are about to blur this new layer.
To apply a slight Gaussian blur to this layer, you need to choose Filters → Blur → Gaussian Blur from the menu bar.
It will open a Gaussian Blur dialogue box as shown in the screenshot below, where you can define how much blur you want to apply.

The default values are pretty good, but you can change it as per your need. I keep Blur Radius to "7" for my logo.
Step 6:
To add a new layer Right-Click on the “Visible” layer in the layer palette, and choose “New Layer" from the context menu. It will add a new layer for you.
Now, to add some interest, we are going to fill this new layer with some color. To do this, we will use the Plasma plugin from here Filters → Render → Clouds → Plasma. You will see Plasma dialog box like specified beneath.

The default value is good, but you can change as per your need. For my logo, I will keep it at 1.4. When you’re done, just hit "OK".
Your layer palette will look something like this.

Your canvas will look like the one I illustrated below.

Step 7:
To open the Bump Map dialog box go to Filters → Map → Bump Map
It will open a Bump Map dialog to give a good preview of what the plug-in does as illustrated in the screenshot below.

Now from the bump map drop down menu select the proper source. For example, In my case, the source is the text layer that we created earlier (the layer was named “Visible”).
So you need to click on the spinner for the Bump map and choose the “Visible” layer from the list.
After selection of visible layer, feel free to play with the other options. For my logo, I changed the Depth value to 8 as shown in the fig. above. Once it looks good, hit the ok button to apply it to the layer.
Your canvas will look like the one I illustrated below.

Step 8:

While adding a Layer Mask set the Initialize Layer Mask to white (full opacity) from the dialog box. Now your layer palette will look similar to the illustration below.

Now we need to copy the “Visible” layer and paste it into the layer mask for the plasma layer. So first, Click on the “Visible” layer in the layers palette to activate it as illustrated in the screenshot below, then press CTRL+C from your keyboard to copy it.

Now re-select the plasma layer to make it active as specified in the screenshot below and press CTRL+V to paste the “Visible” layer back into the image.

It will now insert a Floating Selection (Pasted Layer) into your image as specified in the figure below.

To get this Floating Selection into the mask, we need to Anchor it by selecting Layer → Anchor Layer or by pressing CTRL+H from your keyboard.
This will Anchor the selection down onto the mask. Our image and layers should now look something like this:


Now we want to add a different colored background to help us fine-tune the effects we have so far. To do so, we need to add a new transparent layer to the image as we did when creating the plasma layer and place it below the plasma layer. (You can click and drag layers to change their position in the palette).
Pick an interesting background color and fill the new layer with this color. The layers palette and canvas should now look like this:


Step 9:
To do this, select the layer mask to make it active by clicking on it and select Colors → Levels to open the Adjust Color Levels dialog box, here we need to sharpen up the edges of the mask a little bit as shown in the screenshot below:

Here you can set your own values till you feel good for your logo or If you’re following along, you can also just copy my values from above.
Step 10
Now to do so we need to make a copy of “Visible” layer that had the original blurred text on it as shown in the screenshot below:

This will create a new layer called “Visible copy”. Move this layer above your background color layer to just beneath your plasma layer as shown below (you can Left-Click and drag the layer in the palette):

Now keep the visible copy layer active and select Colors → Invert from the main menu. Now this layer will have a white background below the text logo and we need to remove the white background by using Layer → Transparency → Color to Alpha. The layer should now have black text over a transparent background.
Now select the move tool and while holding SHIFT move the canvas logo to a bit down and a bit right as shown in the screenshot below:

At this point we can make it a bit more fancy by adding a Gaussian Blur to the shadow to spread it out a little more. We can also modify the layer Opacity, adjusting it to let the background show through a bit as well.
Here is the final state of my image, where I applied a Gaussian Blur with a 10px radius, and adjusted the shadow layer Opacity down to 80:

 Step 10:

Here is my final floating logo image when everything is done:

For me, this is a fun process, and I feel by following these simple actions, and concepts you will be ready to design your own floating logo.
However, having a step by step guide doesn't mean you'll design everything fabulous on your first attempt. Start following the method and at some point, you will see your rugged design turns into a classic design.
Getting Started
Step 1:Open GIMP if you have already installed it, if not you can download it from the GIMP official website.
For Convenience, you can use GIMP user interface as a single-window mode by selecting through Windows → Single-Window Mode. It is the one time process and by activating this mode, it will be easier for you to navigate throughout the GIMP interface.
Step 2:
Create a new image:
File >> New or Press CTRL+NTo create a new drawing select file from the menu bar and click new or press CTRL+N from your keyboard.
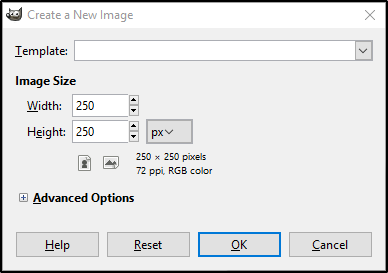
This will open the “Create a New Image” dialog box as specified in the above illustration, with choices for you to specify the picture width and height.
Set the dimensions of this new image to any size you want and hit OK, but for this tutorial, I am going to specify the Width and Height of 250px.
It will open a pure white new image on your canvas.
Step 3:
Fill the New Image with Black
The first thing we are going to do is fill our new image with black color.1) To fill the picture with black color, Set the Foreground Color to black as specified in the screenshot below.

2) Select Bucket Fill Tool from Tool options Toolbox defined in the fig. below or Tools → Paint Tools → Bucket Fill.

Once the tool is activated, click on the image area(Canvas) and your image should now fill with black color.
Step 4:
Adding Some Text
Next step is to add text to your image to create your logo and to do so you need to change the foreground color to something other than black. I changed it to white.Repeat Step 3 to set the foreground color to white. Also, you can quickly swap foreground/background colors using the arrows like the screenshot below or by pressing "X" from your keyboard.

Now add text to your image. To add text select text tool from the Toolbox - tool options like the screenshot below or by pressing "T" from your keyboard.

After Selection of Text Tool, we need to draw a box on our canvas (image) to hold the text. Click on the top-left corner and drag the mouse down to the bottom right corner. You will see something like the screenshot below.

You don't have to worry about being exact at this point because you can set the boundaries of the box later. To re-size the box, click and drag in any of the marked red areas, as shown in the screenshot below.

Add some text inside the box for which you require to design the logo. In my example, I’ll use the word "One".
When you add the text to your canvas, it will appear very small in size. To increase the size select the whole word and increase the size of the font, you can also change the font-family. In my case, I will use 102px as font-size and Georgia Bold as a font family as specified in the screenshot below.

Note: There are some other ways to change the font size and font family for the text, but the way I suggested is the easiest one.
Step 5:
Create a New Layer
Once you got the text how you want it, you need to create a new layer from all the visible layers. To create a new layer, right click on the text layer you just made in the layer docks, and choose “New from Visible” as suggested in the screenshot below.
At this time your Layer palette will have three layers on it as background, the text(One) and new layer visible and look something like this:

As you see above, there is a white border around the “Visible” layer. It means that this layer is currently active and any actions you perform will get implemented on this layer and now we are about to blur this new layer.
To apply a slight Gaussian blur to this layer, you need to choose Filters → Blur → Gaussian Blur from the menu bar.
It will open a Gaussian Blur dialogue box as shown in the screenshot below, where you can define how much blur you want to apply.

The default values are pretty good, but you can change it as per your need. I keep Blur Radius to "7" for my logo.
Step 6:
Adding Color
In this step, we are going to add a new layer to our image.To add a new layer Right-Click on the “Visible” layer in the layer palette, and choose “New Layer" from the context menu. It will add a new layer for you.
Now, to add some interest, we are going to fill this new layer with some color. To do this, we will use the Plasma plugin from here Filters → Render → Clouds → Plasma. You will see Plasma dialog box like specified beneath.

The default value is good, but you can change as per your need. For my logo, I will keep it at 1.4. When you’re done, just hit "OK".
Your layer palette will look something like this.

Your canvas will look like the one I illustrated below.

Step 7:
Bump Mapping
In this step using "bump mapping" process we’re going to produce a fake 3D shape on this plasma layer utilizing the text we created earlier.To open the Bump Map dialog box go to Filters → Map → Bump Map
It will open a Bump Map dialog to give a good preview of what the plug-in does as illustrated in the screenshot below.

Now from the bump map drop down menu select the proper source. For example, In my case, the source is the text layer that we created earlier (the layer was named “Visible”).
So you need to click on the spinner for the Bump map and choose the “Visible” layer from the list.
After selection of visible layer, feel free to play with the other options. For my logo, I changed the Depth value to 8 as shown in the fig. above. Once it looks good, hit the ok button to apply it to the layer.
Your canvas will look like the one I illustrated below.

Step 8:
Apply a Layer Mask
In this step, we need to add a Layer Mask to the plasma layer to isolate our bump mapped text. Doing so you need to Right-Click on the plasma layer and choose “Add Layer Mask" as specified beneath:
While adding a Layer Mask set the Initialize Layer Mask to white (full opacity) from the dialog box. Now your layer palette will look similar to the illustration below.

Now we need to copy the “Visible” layer and paste it into the layer mask for the plasma layer. So first, Click on the “Visible” layer in the layers palette to activate it as illustrated in the screenshot below, then press CTRL+C from your keyboard to copy it.

Now re-select the plasma layer to make it active as specified in the screenshot below and press CTRL+V to paste the “Visible” layer back into the image.

It will now insert a Floating Selection (Pasted Layer) into your image as specified in the figure below.

To get this Floating Selection into the mask, we need to Anchor it by selecting Layer → Anchor Layer or by pressing CTRL+H from your keyboard.
This will Anchor the selection down onto the mask. Our image and layers should now look something like this:


Now we want to add a different colored background to help us fine-tune the effects we have so far. To do so, we need to add a new transparent layer to the image as we did when creating the plasma layer and place it below the plasma layer. (You can click and drag layers to change their position in the palette).
Pick an interesting background color and fill the new layer with this color. The layers palette and canvas should now look like this:


Step 9:
Adjusting the Levels
In this step, we need to clean up the edges of the text with what we have so far. To make it sharper, we are going to adjust the levels on the mask for that layer.To do this, select the layer mask to make it active by clicking on it and select Colors → Levels to open the Adjust Color Levels dialog box, here we need to sharpen up the edges of the mask a little bit as shown in the screenshot below:

Here you can set your own values till you feel good for your logo or If you’re following along, you can also just copy my values from above.
Step 10
Creating a Drop Shadow:
In this step we are going to add an effect of a drop shadow behind the logo to make it seem as if it’s floating above the background.Now to do so we need to make a copy of “Visible” layer that had the original blurred text on it as shown in the screenshot below:

This will create a new layer called “Visible copy”. Move this layer above your background color layer to just beneath your plasma layer as shown below (you can Left-Click and drag the layer in the palette):

Now keep the visible copy layer active and select Colors → Invert from the main menu. Now this layer will have a white background below the text logo and we need to remove the white background by using Layer → Transparency → Color to Alpha. The layer should now have black text over a transparent background.
Now select the move tool and while holding SHIFT move the canvas logo to a bit down and a bit right as shown in the screenshot below:

At this point we can make it a bit more fancy by adding a Gaussian Blur to the shadow to spread it out a little more. We can also modify the layer Opacity, adjusting it to let the background show through a bit as well.
Here is the final state of my image, where I applied a Gaussian Blur with a 10px radius, and adjusted the shadow layer Opacity down to 80:


The End Steps:
Your 3D floating logo is ready now to export in the format you want. Before exporting it make sure to turn off the visibility of first four layers in the layer palette as shown in the screenshot below:
Here is my final floating logo image when everything is done:
Amazing I made my 1st 3D logo with this tutorial!
ReplyDelete